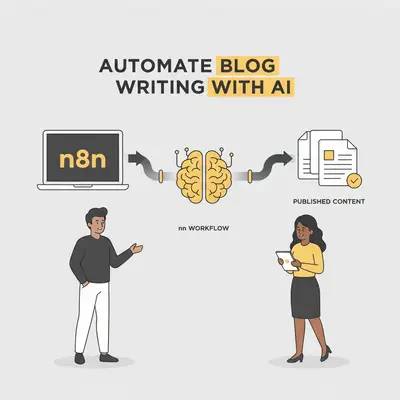
Writing high-quality blog posts takes time. You spend hours researching, outlining, drafting, and editing. On the other hand, asking ChatGPT to "write a blog post about X" usually results in a generic, repetitive wall of text that readers immediately click away from.
The middle ground—and the sweet spot for modern businesses—is engineered automation.
By using n8n, you can build a sophisticated "assembly line" for content. Instead of one giant prompt, you create a workflow that mimics a human writer's process: research, outline, draft section-by-section, and format.
This guide breaks down exactly how to build an automated blog writing agent in n8n that produces content worth reading.
Why n8n Wins for Content Automation
You might wonder why you shouldn't just use the ChatGPT interface or a simpler tool like Zapier.
The interface of ChatGPT has a "context limit" on how much structure it can handle before it gets confused. Zapier can be expensive when you have high-volume tasks with many steps.
n8n shines here for three reasons:
- Complex Looping: You can generate an outline with 5 headings, then tell n8n to "loop" through each heading and write a specific section for it. This keeps the AI focused and prevents it from rushing to the end.
- Data Handling: n8n excels at passing JSON data. You can force the AI to output structured data (like
{"title": "...", "content": "..."}) which n8n can then format into Markdown or HTML. - Cost Control: You use your own API keys (OpenAI, Anthropic), meaning you pay wholesale prices for intelligence rather than a markup subscription.
Pro Tip: If you are debating between platforms, read our deep dive on Make vs n8n 2025 AI Automation Comparison to see why n8n is often preferred for heavy-text workflows.
The Architecture of a Writer Agent
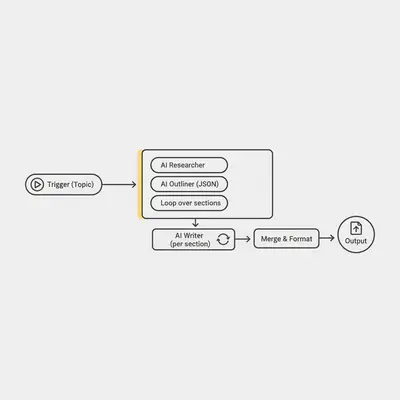
A successful writing automation isn't a straight line; it's a process. Here is the architecture we will build:
- Input Trigger: A keyword or topic (e.g., from a Google Sheet or Airtable).
- The Researcher: An AI node that generates a semantic outline or searches the web.
- The Architect: An AI node that turns research into a structured JSON outline.
- The Writer (The Loop): An AI node that runs individually for each section of the outline.
- The Compiler: Merging all sections back into one document.
- The Publisher: Sending the draft to WordPress, Ghost, or a Markdown file.
Step 1: The Trigger and Research
First, you need a topic. We recommend setting up a "Content Calendar" in Google Sheets or Airtable.
In n8n, use the Google Sheets Trigger node (or a standard Google Sheets node on a schedule) to look for rows where the status is "Ready to Write."
Adding Context (Optional but Recommended)
If you want the post to be factual, don't rely solely on the AI's training data. Connect an HTTP Request node to a search API (like SerpApi or Tavily) to fetch the top 3 Google results for your keyword. Feed this text into your next AI prompt.
This technique is crucial for reducing hallucinations.
Related Resource: Learn more about managing inputs in Prompt Engineering Step by Step Checklist.
Step 2: The Architect (Generating the Outline)
This is the most critical step. If the outline is bad, the post will be bad.
Use an OpenAI or Anthropic node. We prefer Claude 3.5 Sonnet or GPT-4o for this step because of their strong reasoning capabilities.
The System Prompt:
"You are an expert SEO content strategist. Create a detailed blog outline for the topic: {{topic}}. The outline must be structured as a JSON array."
The User Prompt:
"Generate 5-7 clear headings. For each heading, provide a 'directive'—a brief instruction on what that section should cover. Output ONLY JSON."
Example JSON Output:
[
  {
    "heading": "Why Automation Matters",
    "directive": "Explain the time savings and error reduction of AI."
  },
  {
    "heading": "Setting Up n8n",
    "directive": "Walk through the installation and basic node setup."
  }
]
Use the JSON Parse node in n8n to turn this text response into a usable data array.
Step 3: The Writer Loop (The Secret Sauce)
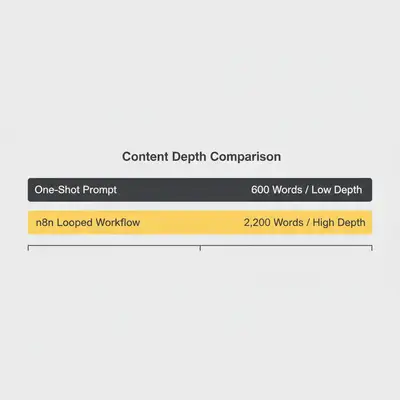
Most beginners skip this and just ask the AI to "write the whole blog." That results in a shallow 600-word post.
Instead, we use a Loop (Code) node or Split In Batches node in n8n.
- Split the JSON array: Feed the outline items into the loop.
- The Writer Node: Inside the loop, place another AI node.
- The Prompt:
- Context: "You are writing one section of a blog post."
- Input: "Heading: {{$json.heading}}. Instructions: {{$json.directive}}."
- Style: "Write 300-400 words. Use short paragraphs. Use Markdown formatting. Do not include the heading itself in the output (we will add that later)."
By doing this, if you have 6 outline items, you get 6 individual calls to the AI. The result is a comprehensive 1,800+ word article with depth in every section.
Key Insight: This method allows you to change models mid-stream. You could use a "reasoning" model like o1 for the outline, and a faster model like GPT-4o-mini for the drafting if you are cost-conscious.
Step 4: Compiling and Formatting
Once the loop finishes, you'll have multiple items in n8n, each containing a chunk of text.
- Code Node: Use a simple JavaScript snippet to join the array.
// Conceptual example let fullPost = ''; for (item of items) { fullPost += '## ' + item.json.heading + '\n\n'; fullPost += item.json.content + '\n\n'; } return [{ json: { post: fullPost } }]; - Frontmatter Generation: You can have one final AI step generate the YAML frontmatter (title, excerpt, tags) based on the full text.
- Output: Use a Google Docs, Wordpress, or Github node to save the file.
Reality Check: Always output to a "Draft" status. Even the best AI workflows require a human eye to check for flow and tone.
Cost Analysis: Is It Worth It?
Building this in n8n might take a few hours of setup, but the operational costs are incredibly low compared to hiring human writers for first drafts.
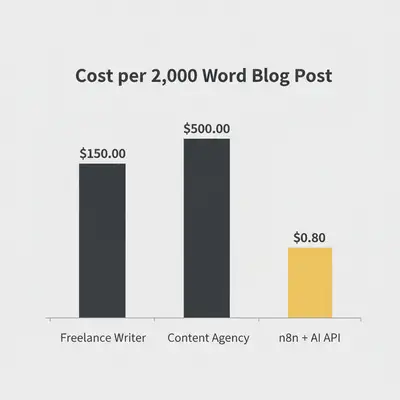
Let's look at the math for a 2,000-word article:
- Research (Search API): ~$0.02
- Outline (GPT-4o): ~$0.05
- Drafting (GPT-4o - 6 sections): ~$0.30 - $0.50
- Total: Under $1.00 per post.
Compare this to a freelance writer ($150+) or even a cheap content mill ($50+).
Quick Win: Monitor your token usage to avoid surprise bills. Read our guide on How to Calculate Token Costs for an AI Project.
Advanced Optimization Tips
Once you have the basic flow working, here is how to make it "pro" level:
1. Style Guides & System Prompts
Don't just use the default system prompt. Upload your brand guidelines or a sample of your best writing to the AI's context window. This helps match your tone.
- Learn more: System Prompt vs User Prompt
2. SEO Integration
Add a step before the "Architect" node that pulls LSI keywords and semantic terms relevant to your topic. Pass these to the Writer node with instructions to "naturally include these keywords."
3. Image Generation
You can add an OpenAI (DALL-E 3) node to generate a featured image based on the title the AI created.
4. Optimize for Stability
Large workflows can crash if data isn't handled correctly. Ensure you are using error handling nodes (like "Stop and Error") to alert you via Slack if a generation fails.
Conclusion
Automating your blog writing with n8n isn't about replacing creativity; it's about replacing the drudgery. By offloading the research, outlining, and initial drafting to a structured AI workflow, you free up your time to focus on the 10% that actually matters: strategy, unique insights, and final polish.
Key Takeaways:
- Don't One-Shot It: Use n8n to break blog writing into steps (Research -> Outline -> Write -> Format).
- Looping is Key: Writing section-by-section creates deeper, longer, and more coherent content.
- Structured Data: Force the AI to output JSON so your automation can handle the text programmatically.
Ready to build your content engine?
Related Resources
- Ultimate n8n Tips and Tricks 2025
- How to Choose the Best AI Model for Your Use Case
- Building Your AI Platform Tech Stack
- Are AI SEO Writers Worth It? Cost-Benefit Analysis 2025