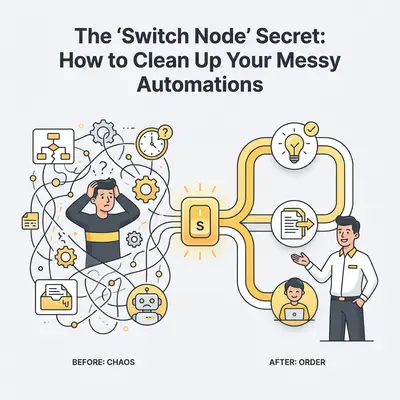
You open your automation platform. You stare at a workflow that looks like a bowl of spaghetti.
Lines cross everywhere. Logic branches off into more branches. To find where an email gets sent, you have to scroll three screens to the right. You dread the moment you have to change a single setting because you know one wrong move will break the whole chain.
This is the "Nested IF Trap."
It happens to almost everyone who starts building automations in tools like Make or n8n. You start with a simple question: "Is this a new customer?" If yes, do X. If no, do Y.
But then business gets complex. "Is this a new customer? If yes, are they from the US? If yes, did they buy Product A or B?"
Suddenly, you have a cascading nightmare of logic steps that is impossible to read and even harder to debug.
There is a better way. It’s called the Switch Node pattern, and it’s the secret to keeping your automations clean, readable, and scalable.
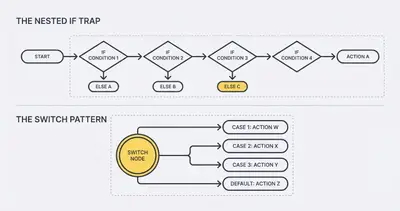
The Problem: The "If/Else" Staircase
Most beginners build logic linearly. They ask a question, handle the "True" path, and then ask another question inside the "False" path.
In visual automation tools, this creates a "staircase" effect.
- Check 1: Is the status "Paid"?
- If No: Check 2: Is the status "Pending"?
- If No: Check 3: Is the status "Failed"?
Every new condition requires a new node. Your workflow expands horizontally, pushing the actual actions further away from the trigger.
Reality Check: If you have to click more than three nodes deep to find out what happens to a specific data type, your workflow is too complex.
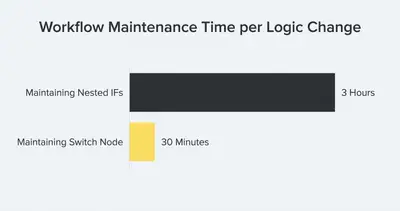
This structure kills productivity. If you need to add a fourth status ("Refunded"), you have to break the chain, insert a new IF node, re-connect the wires, and test everything again. It is slow, risky, and error-prone.
The Solution: The Switch Node (The Traffic Cop)
The Switch Node (called a "Router" in Make or "Switch" in n8n) changes the geometry of your automation.
Instead of a long chain of questions, the Switch Node acts as a central hub. It stands in the middle of the road and directs traffic.
It looks at the data coming in—let's say an Order Status—and instantly routes it to the correct path based on the value.
- Input: Order Status
- Path 1 (Rule: "Paid"): Send Thank You Email
- Path 2 (Rule: "Pending"): Send Reminder
- Path 3 (Rule: "Failed"): Alert Support Team
- Default Path: Log Error
Everything happens in parallel. There is no staircase. All options are visible immediately.
Why This "Secret" Changes Everything
Switching to this pattern isn't just about aesthetics. It fundamentally changes how you manage your business logic.
1. It Makes Debugging Obvious
In a nested chain, if something goes wrong, you have to trace the logic step-by-step to see where it fell off the tracks. With a Switch node, the error is isolated. If the "Paid" path fails, you know exactly which branch to look at. You don't have to check the "Pending" logic at all.
2. It Scales Effortlessly
This is the biggest win for growing businesses. When you launch a new product tier or a new lead source, you don't have to rebuild your workflow.
You simply add one more "limb" to the Switch node. The existing logic for other branches remains untouched and safe.
Quick Win: In n8n, you can add as many output routes to a Switch node as you need. In Make, you add a Router and just keep attaching new modules to it.
3. It Reduces Workflow Execution Costs
In some platforms, stepping through multiple "IF" nodes counts as operations. By using a single Switch/Router, you evaluate the logic once and go straight to the destination. You skip the intermediate checks.
How to Implement the Switch Pattern
The implementation differs slightly depending on your tool, but the concept is identical.
In n8n
n8n has a dedicated node literally called Switch.
- Add the Node: Search for "Switch".
- Select Data Type: Choose "String" (text) if you are routing based on words like "VIP" or "Standard".
- Define Rules:
- Output 0: Value matches "VIP"
- Output 1: Value matches "Standard"
- Output 2: Value matches "Lead"
- Connect Paths: The node will physically show 3 different output dots. Connect your subsequent actions to the matching dot.
For a deeper dive into structuring n8n workflows for production, check out our guide on n8n workflow design patterns.
In Make (formerly Integromat)
Make uses a module called a Router.
- Add the Router: It’s a green icon usually found in the "Flow Control" section.
- Attach Modules: Connect as many paths as you need to the Router.
- Set Filters (Crucial Step): The Router itself doesn't hold the logic; the paths do. Click the wrench icon on the connection line between the Router and the next module.
- Path A Filter:
Status(Equal to)Paid - Path B Filter:
Status(Equal to)Pending
- Path A Filter:
- Fallback: Make allows you to designate one route as a "Fallback" route, which runs only if no other route matches.
Pro Tip: Always include a "Fallback" or "Default" route. If data comes in that doesn't match any of your rules (e.g., a typo in the status), this route should send you a Slack alert or email. Otherwise, the data just disappears silently.
Real-World Use Case: The "All-In-One" Lead Router
Let's look at a classic scenario where the Switch node saves the day: Inbound Lead Processing.
Your business gets leads from three sources:
- Website Contact Form (High intent, needs email)
- Facebook Ads (Medium intent, add to CRM)
- Partnership Referral (VIP, alert Slack immediately)
The Messy Way (Nested IFs)
You trigger on a new lead.
- Node 1: Is source Facebook?
- Yes: Add to CRM.
- No: Node 2: Is source Website?
- Yes: Send Email.
- No: Node 3: Is source Referral?
- Yes: Slack Alert.
If you add "LinkedIn Ads" next month, you have to break the "No" path on Node 1 or Node 2 and squeeze it in. It’s messy.
The Switch Way
You trigger on a new lead.
- Node 1 (Switch): Check "Source".
- Path 1: Rule "Facebook" -> CRM Node
- Path 2: Rule "Website" -> Email Node
- Path 3: Rule "Referral" -> Slack Node
- Path 4: Rule "LinkedIn" -> CRM Node
Adding LinkedIn took 10 seconds. You added Path 4 and connected it to the existing CRM node (or a copy of it). The logic is flat, clean, and visible.
When NOT to Use a Switch Node
While powerful, the Switch node isn't for everything.
If your logic is strictly binary—True or False—a standard IF node is actually better. It is simpler to read "If X, then Y, else Z" than to set up a router for a simple toggle.
Example: "Does the email contain an attachment?"
- Yes: Save to Drive.
- No: Do nothing.
Use an IF node here. Reserve the Switch pattern for decisions involving 3 or more options or distinct categories.
Cleaning Up Your Current Automations
You don't have to rebuild everything overnight. Start with your most painful workflow—the one you are afraid to touch.
- Map the Logic: Write down the distinct categories you are actually sorting for (e.g., Lead Sources, Ticket Types, Order Statuses).
- Insert the Switch: Disconnect the first "IF" node and drop in a Switch/Router.
- Migrate One Branch: Move the logic for the first category to the new Switch path. Test it.
- Repeat: Move the rest.
- Delete the Stairs: Delete the old chain of nested IF nodes.
You will likely find that your workflow is now half the size visually and runs faster.
Key Insight: Clean automation is safe automation. If you can't understand what your workflow does by looking at it for 5 seconds, it is too complex.
Summary
The Switch Node pattern moves you from "amateur tinkerer" to "automation architect." It replaces fragile chains of logic with a robust, scalable hub.
Key Takeaways:
- Avoid Nested IFs: They create maintenance nightmares and hide logic deep in the chain.
- Use Switch/Routers: They centralize decision-making and handle multiple categories in parallel.
- Always use a Fallback: Catch unexpected data so it doesn't vanish silently.
- Start Small: Refactor one complex workflow this week to see the difference in clarity.
Ready to take your automation skills further? Once your logic is clean, you can start optimizing for speed and scale. Check out our guide on scaling issues in workflow automation to prepare for what comes next.
Related Resources
- n8n Workflow Design Patterns for Production
- How to Debug Automation When It Stops Working
- Make vs n8n: Which Tool Fits Your Logic?
- Scaling Issues in Workflow Automation
Official Sources
- n8n Documentation: Switch Node
- Make Documentation: Router Module
- Make Academy: Filtering and Routing
By Kevin Michael Schindler, AI Automation Expert at Evalics