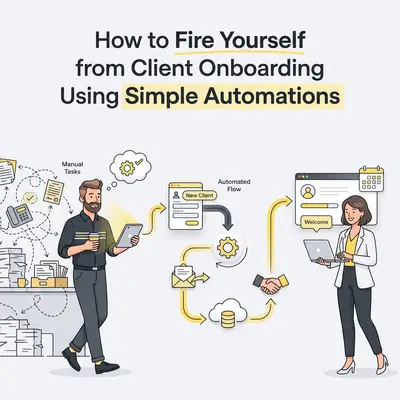
You just closed a new client. The proposal is signed. The deposit hit your bank account. You should be celebrating.
Instead, you are dreading the next two hours.
You have to create a new Google Drive folder. You have to duplicate your project management template. You have to draft the welcome email. You have to invite them to your Slack channel. You have to brief your team.
This administrative chore kills your momentum. It creates delays for the client. It invites human error.
If you want to scale your business, you cannot be the bottleneck for new revenue. You need to fire yourself from the administrative side of client onboarding. Here is exactly how to build a hands-off onboarding system using simple automations.
The True Cost of Manual Onboarding
Most small business owners drastically underestimate the time they spend setting up new clients.
Let's say it takes you 90 minutes to manually provision folders, send emails, and set up project boards. If you close just four clients a month, you lose six hours to pure data entry. Over a year, that is nearly two full work weeks wasted on copying and pasting.
Beyond the time cost, manual onboarding looks unprofessional. If a client pays a $5,000 invoice on a Friday afternoon, they shouldn't have to wait until Monday morning for a welcome packet just because you stepped away from your computer.
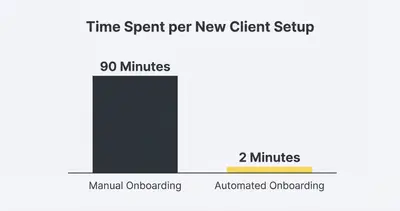
Automation bridges this gap. It provides an instant, flawless experience for your client while you focus on the actual work.
Quick Win: Before you build any automation, document your current process. Write down every single click, copy, and paste you perform when a new client signs on. You cannot automate a process you haven't clearly defined.
The 4-Step "Fire Yourself" Framework
To completely step away from the setup process, you need a workflow platform like Make or n8n. These tools act as the central nervous system connecting your payment processor, your file storage, and your communication tools.
Here is the exact framework you need to build.
1. Establish the "Point of No Return" Trigger
Every automation needs a trigger to start. For onboarding, you want an undeniable signal that the client has officially hired you.
Do not trigger onboarding workflows when a client merely says "yes" on a sales call. Verbals fall through.
Instead, use a hard commitment. The best triggers are:
- A signed contract in a tool like PandaDoc or DocuSign.
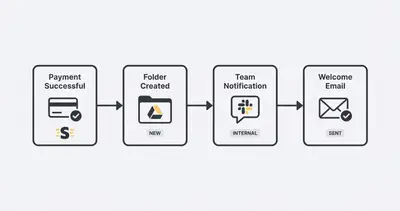
- A paid deposit invoice in Stripe or QuickBooks.
When this event happens, your automation platform catches the signal (via a webhook or native integration) and starts the engine.
If you are curious about connecting invoices to specific actions, read our guide on Automating Client Onboarding Paid Invoice to Welcome Packet.
2. Automate File and Workspace Creation
The moment the payment clears, your automation should instantly build the client's digital workspace.
Your workflow should perform these actions automatically:
- Create a Root Folder: Automatically create a new folder in Google Drive or Dropbox named
[Client Company Name] - [Project Type]. - Generate Subfolders: Create nested folders inside for "Invoices," "Deliverables," and "Brand Assets."
- Create Project Boards: Duplicate your standard client template in ClickUp, Asana, or Trello.
- Rename the Board: Title it with the client's name so your team knows exactly where to work.
Pro Tip: When your workflow creates the Google Drive folder, make sure it extracts the "Shareable Link" variable. You will need this link for the final step.
3. Automate Internal Team Handoffs
Your team needs to know a new deal just landed. Usually, you would type out a long Slack message explaining the project. Automation does this for you instantly.
Add a Slack or Discord module to your workflow. Set it up to send a message to your #sales-wins or #general channel.
The automated message should include:
- The client's name and company.
- The package they purchased.
- A link to their new project management board.
- A link to their newly created Google Drive folder.
Now, your entire team has the resources they need to start working before you even look at your phone. If you want to identify other internal bottlenecks, check out our list of 5 Manual Tasks You Must Automate Before Hiring More Staff.
4. Send the Automated Welcome Packet
This is the most critical step for the client experience. The moment they pay, they should receive a professional, detailed welcome email.
Use your automation tool to send an email through your Gmail or Outlook account. Because the automation holds all the data from the previous steps, you can hyper-personalize the message.
Here is what the automated email should look like:
"Hi [Client First Name],
Welcome aboard! We successfully received your deposit for the [Project Type] package.
We are thrilled to start working with [Company Name]. To keep things organized, we have already set up your dedicated project folder here: [Insert Google Drive Link].
Next Steps: 1. Please upload your brand logos to the folder linked above. 2. Book your onboarding strategy call using my Calendly link here: [Insert Link].
Talk soon!"
This email feels entirely personal. But zero human effort went into sending it.
How to Choose Your Automation Tool
To build this system, you need the right software. You do not need an enterprise budget, but you do need reliability.
Make (formerly Integromat): This is highly recommended for beginners. It offers a visual, bubble-based interface. You can clearly see how data flows from Stripe to Google Drive to Gmail. It handles complex data routing beautifully.
n8n: If you are slightly more technical or want to keep your monthly software costs near zero, n8n is an incredible choice. It allows for advanced logic and custom webhooks. For a deep dive into platform differences, review our Make vs n8n 2025 AI Automation Comparison.
Zapier: The most famous option, but it becomes very expensive very fast when building multi-step workflows like the one described above.
Ready to stop doing manual data entry? If you want an expert to map out and build your ideal onboarding flow, book a free strategy call with Evalics today. We specialize in workflow automation for growing businesses.
Common Pitfalls That Break Onboarding Automations
Automation only works if you build it correctly. Avoid these common traps when designing your onboarding flow.
Relying on Bad Data Forms
If a client misspells their own email address or company name during checkout, your automation will propagate that typo across Google Drive, your CRM, and your project management tool. Keep your intake forms simple, and use validation fields to ensure emails are formatted correctly.
Over-Automating the Relationship
Automation should handle the administration, not the relationship. Do not try to automate the strategy call or the initial creative brainstorming. Automate the folder creation so you have more energy to dedicate to the actual client conversation.
Forgetting the "Delay" Node
Sometimes, APIs need a second to breathe. If you instruct your automation to create a Google Drive folder and then immediately try to upload a document into that folder, it might fail because the folder hasn't fully registered on Google's servers.
Reality Check: Always add a 30-second to 1-minute "Delay" or "Sleep" node after creating new infrastructure (like a folder or a workspace board) before trying to add items to it.
For a broader look at where workflows break, read up on the 7 Common AI Automation Mistakes Beginners Make and How to Fix Them.
Summary and Next Steps
Manual onboarding punishes you for growing your business. Every new client means more administrative drag on your schedule.
By firing yourself from this process, you achieve three things:
- You reclaim your time: Hours of data entry vanish immediately.
- You eliminate errors: Automations never misspell a folder name or forget to attach a link.
- You impress the client: They receive a polished, professional welcome packet within seconds of paying their invoice.
Start small. Tomorrow, map out your current onboarding steps on a piece of paper. Identify your trigger point, your file storage tool, and your communication channels. Then, string them together using Make or n8n.
Once you experience the relief of an automated onboarding sequence, you will never want to manually copy-and-paste a welcome email again.
Ready to streamline your operations and scale without hiring more admin staff? Book a demo with Evalics today and let's build your perfect client onboarding system.
By Kevin Michael Schindler, AI Automation Expert at Evalics
Related Resources
- Automating Client Onboarding Paid Invoice to Welcome Packet
- 5 Manual Tasks You Must Automate Before Hiring More Staff
- Make vs n8n 2025 AI Automation Comparison
- 7 Common AI Automation Mistakes Beginners Make and How to Fix Them