You sit down at your desk, ready to automate your business. You open n8n. You stare at a blank grid. Ten minutes later, you close the tab and go back to manually copying and pasting data.
This blank canvas paralysis is the number one reason small business owners abandon automation. Software like n8n is incredibly powerful, but that power comes with a learning curve. When you look at an empty workflow, it is hard to visualize how different apps connect.
You do not need to build a massive, 50-step AI automation on day one. You need quick wins. You need workflows that take a few minutes to configure but save you hours of manual labor over the next month.
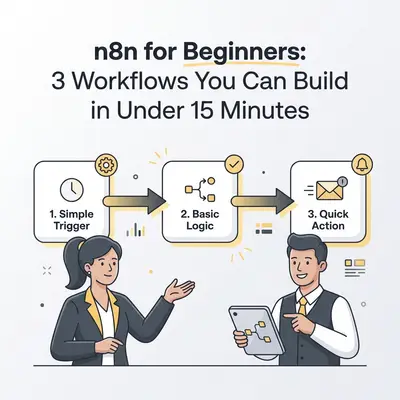
Here is exactly how to build three high-impact n8n workflows in under 15 minutes each.
The Pre-Flight Checklist
Before you start the timer, you need three things ready:
- An active n8n instance: Either an n8n Cloud account or a locally hosted version.
- Active accounts for your tools: Google Workspace, Slack, and your CRM or form builder.
- Patience for credentials: The very first time you connect an app like Google Sheets to n8n, you must authenticate it. Do this before you start building. Go to Credentials in the left menu, click Add Credential, and connect your Google and Slack accounts.
Reality Check: Setting up OAuth credentials for Google can be tedious for beginners. Follow the official n8n documentation exactly. Once authenticated, you never have to do it again.
Workflow 1: The Automated Lead Catcher
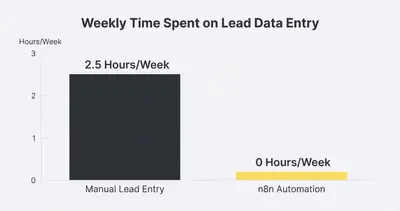
Scenario: A potential client fills out a contact form on your website. Right now, that submission goes to your email. You manually read it, type their name into a Google Sheet, and send a Slack message to your team to follow up.
Goal: Instantly log form submissions into a database and notify your team automatically. Build Time: 8 Minutes
Step 1: Add Your Trigger Node
Every automation needs an event to kick it off. In n8n, click the Add first step button. Search for your form provider (like Typeform, Tally, or Webhook). Select the trigger event: On Form Submission. Click Test step or Listen for event, then go fill out your actual website form with test data. The node will turn green and display your test data.
Step 2: Connect Google Sheets
Click the little plus + icon on the right side of your trigger node. Search for Google Sheets.
Select the action: Append or Update Row.
Connect your Google Credential. Select your specific spreadsheet and the tab where you track leads.
Now comes data mapping. In the Google Sheets node, you will see fields matching your spreadsheet columns (e.g., Name, Email, Phone). Click and drag the data points from your form trigger on the left side of the screen directly into the corresponding fields on the right.
Step 3: Connect Slack
Click the plus + icon next to the Google Sheets node. Search for Slack.
Select the action: Post Message.
Choose the channel where you want the alert to go (e.g., #sales-leads).
In the text box, type your message and drag in variables from the form. For example: "New lead received! Name: [Drag Name Here]. Email: [Drag Email Here]. They have been added to the tracking sheet."
Quick Win: Always click "Execute Node" as you build each step. Testing node-by-node ensures data is flowing correctly before you activate the entire workflow.
Workflow 2: The Morning Calendar Briefing
Scenario: You wake up, open your phone, and immediately start frantically checking Google Calendar to see who you are meeting with today. You miss prep time because an important client call slipped your mind.
Goal: Have n8n send a summarized list of today's meetings directly to your personal Slack channel or email at 7:00 AM every morning. Build Time: 10 Minutes
Step 1: Add the Schedule Trigger
Click Add first step and search for Schedule. Set the rule: Every Day. Set the time to your preferred wake-up time, like 7:00 AM.
Step 2: Fetch Calendar Events
Click the + icon and search for Google Calendar.
Select the action: Get Many Events.
Connect your credential and select your primary calendar.
Under options, configure the date limits. Set "Time Min" to today at 12:00 AM, and "Time Max" to today at 11:59 PM. This ensures n8n only pulls events happening today.
Step 3: Format the Output (The Item Lists Node)
If you have five meetings today, Google Calendar outputs five separate items. You want one clean message. Add an Item Lists node. Select the action: Aggregate Items. This node takes multiple outputs and bundles them into a single list. Choose the specific fields you want to keep, like "Summary" (the meeting title) and "Start Time".
Step 4: Send the Briefing
Add your final node: Slack or Gmail. If using Slack, select Post Message. Direct it to yourself (a private message). In the text box, write: "Good morning! Here is your schedule for today:" Below that, drag in the aggregated list of meetings from your Item Lists node. Turn the workflow on. You will never be surprised by a morning meeting again.
Pro Tip: Timezones are the silent killer of calendar automations. Make sure your n8n workspace timezone matches your actual timezone. Go to Settings > Workflow Settings in n8n to verify this before testing.
Workflow 3: The "Ghosted Client" Follow-Up
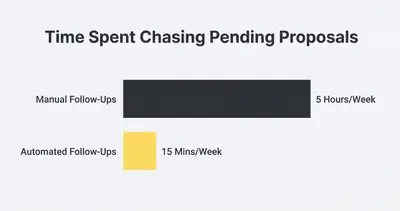
Scenario: You send out proposals or invoices, but you forget to follow up three days later. You lose revenue simply because you got too busy to send a polite "just checking in" email.
Goal: Check your tracking sheet every morning, find proposals sent exactly three days ago that are still marked "Pending," and automatically email the client. Build Time: 15 Minutes
Step 1: Add the Schedule Trigger
Just like the previous workflow, start with a Schedule trigger. Set it to run once a day, perhaps at 9:00 AM.
Step 2: Read Your Tracking Sheet
Add a Google Sheets node. Select the action: Get Many Rows. Point it to your "Proposals" spreadsheet. This node will pull every single row of data from your sheet into n8n.
Step 3: Filter the Data (The IF Node)
You do not want to email everyone. You only want to email people who haven't paid. Add an IF node. This is your logic gate. Set up two conditions:
- Drag in the "Status" column from Google Sheets. Set the condition to:
StatusEqual toPending. - Add a second condition. Drag in the "Date Sent" column. Set the condition to find dates that are exactly 3 days old. (n8n has built-in date math functions for this under expressions).
The IF node splits your workflow into two paths: "True" and "False".
Step 4: Send the Follow-Up Email
On the "True" output of the IF node, add a Gmail node. Select the action: Send Email. Connect your Gmail credential. Map the recipient email address by dragging the "Email" field from the Google Sheets data. Write a templated subject line: Following up on your proposal: [Drag Company Name] Write the body: "Hi [Drag First Name], I wanted to float this to the top of your inbox. Do you have any questions about the proposal I sent a few days ago?"
Why Beginners Fail With n8n (And How to Succeed)
Building these three workflows gives you a foundational understanding of triggers, logic gates, and data mapping. However, beginners often hit roadblocks when expanding these concepts. Avoid these common mistakes:
Ignoring Data Structures
n8n processes data in JSON format. It looks like a list of key-value pairs (e.g., "Name": "John"). When you drag and drop data between nodes, you are actually writing a small piece of code called an Expression. If a workflow fails, it is usually because the node expected a text format but received a number format. Always look at the output data preview in the node settings.
Building Monolithic Workflows
When you realize how easy n8n is, the temptation is to build a massive 30-step workflow that handles your entire business. Do not do this. Large workflows are hard to debug. Keep your workflows small and modular. Build one workflow for lead capture, and a separate workflow for invoicing.
Forgetting Error Handling
What happens if your Google Sheet is temporarily down? The workflow fails. Click the gear icon inside any node to access its Settings. Toggle on Continue On Fail. This ensures that if a non-critical step breaks, the rest of your automation can still run. You can also set up a generic Error Trigger workflow that alerts your Slack channel whenever any workflow in your account encounters an issue.
Taking Your Next Steps in Automation
You have just built an automated data entry system, a custom daily briefing, and an intelligent sales follow-up sequence. You saved hours of manual work without writing a single line of code.
The real power of business process automation is reclaiming your time. You can spend those saved hours talking to clients, improving your product, or simply taking a break.
Once you master these basic trigger-action setups, you can explore adding advanced AI nodes, connecting external databases, or building complex multi-agent workflows. Start small, test frequently, and watch your business scale.
Ready to implement these automations across your entire organization? Book a demo with Evalics today to see how custom n8n architecture can transform your daily operations.
Related Resources
- The 10 Minute n8n Setup That Replaces a Full Time VA
- n8n for Beginners Blueprint Build First Workflow
- 7 Hidden n8n Features Save Time
- Stop Paying for Zapier 5 n8n Workflows Every Agency Needs