Prefer a full transcript? Open the video watch page.
You spend 10 hours a week just moving data around. A new inquiry lands in your inbox. You copy the prospect's name. You open a new tab for your CRM. You paste the name. You tab back for the email address. You tab back to paste it.
Then, you switch to Slack to tell your sales team to follow up.
It is mind-numbing work. (automate your workflow) It is prone to human error. Most importantly, it is a massive waste of your time. If you are paying an employee to do this, you are burning money on a task a machine can do perfectly in three seconds.
In this guide, we will build the ultimate lead generation workflow in n8n. We will automate the entire process—from the moment a lead submits a form to the second they land in your CRM and notify your team.
The Real Cost of Manual Lead Entry
Before we build the workflow, let's look at the math. Manual data entry feels free because you are already paying for the software or the employee. It isn't free.
If a team member spends just 2 hours a day processing leads, cleaning up data, and updating the CRM, that equals 10 hours a week. At an average rate of $30 an hour, that is $300 a week.
Over a year, you are spending over $15,000 just to move text from one screen to another.
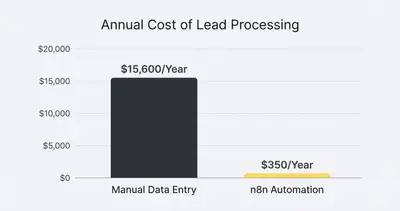
By switching to a self-hosted or basic cloud n8n setup, your software costs drop to a few hundred dollars a year. The AI API costs to process those leads will be pennies per day.
Key Insight: You cannot scale a business if your team is bogged down by manual data entry. Growth requires systems that handle volume automatically.
The Architecture of the Ultimate Lead Workflow
A robust lead generation workflow does four things flawlessly:
- Catches the data the second it arrives.
- Cleans and structures the information.
- Updates the database without creating duplicates.
- Alerts the humans who need to take action.
To achieve this in n8n, we will use a sequence of four specific nodes. You do not need to be a software engineer to build this. You just need to understand how the data flows.
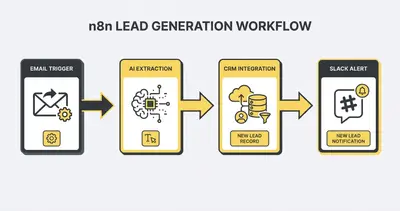
Let's build it step by step.
Step 1: Catching the Lead (The Trigger)
Every automation needs a trigger. This is the event that tells n8n to wake up and start working. For lead generation, you have two primary options: Webhooks or Email Triggers.
Option A: The Webhook (Recommended)
If your leads come from a website form (like Typeform, Gravity Forms, or Webflow), use a Webhook node.
Webhooks act like a dedicated phone line. When a user clicks "Submit" on your site, the form instantly "calls" your n8n webhook and hands over the data. It is instant and highly reliable.
- Add a Webhook node in n8n.
- Set the HTTP Method to
POST. - Copy the Test URL and paste it into your form builder's webhook settings.
- Submit a test lead on your website. n8n will instantly capture the data.
Option B: The IMAP Email Node
If you receive leads via a third-party directory (like Zillow, Yelp, or a specialized industry site) that only sends email notifications, you need to read the inbox directly.
Use the n8n Email Read (IMAP) node. You can refer to the official n8n IMAP documentation to configure your inbox credentials. Set the node to trigger only on unread emails from that specific sender.
Pro Tip: Create a dedicated forwarding address (e.g.,
[email protected]). Send all lead notifications there. Point n8n to that specific inbox to keep the workflow isolated from your messy personal inbox.
Step 2: Extracting Data with AI
This is where the magic happens. If you used a Webhook, your data is probably already organized neatly into fields like Name, Email, and Company.
But if you are using an Email trigger, the lead's information is buried inside a paragraph of text. Historically, you had to write complex Regex (regular expressions) to scrape the data out. If the email format changed slightly, the automation broke.
Today, we use AI to do the heavy lifting.
Add an OpenAI or Anthropic node to your workflow. You will pass the raw email text to the AI model and ask it to extract the details.
The secret to making this reliable is enforcing structured output. Do not let the AI reply with a conversational paragraph. Force it to reply in JSON format. (You can read more about this in the OpenAI structured outputs guide).
Your AI prompt should look like this:
"You are a data extraction assistant. Read the following email text and extract the lead's name, email, phone number, and company name. Return the result strictly as a JSON object with the keys: name, email, phone, company. If a piece of data is missing, leave the value null."
Now, no matter how messy the email is, the AI will consistently hand the next step a perfectly formatted set of data.
Step 3: Pushing to the CRM (Without Duplicates)
Now that we have clean data, it needs to go into your database. Whether you use HubSpot, Pipedrive, or Salesforce, n8n likely has a pre-built node for it.
Here is the biggest mistake beginners make: They use the "Create Contact" operation.
If you use "Create Contact", the workflow will blindly create a new record every single time it runs. If a prospect fills out your form twice, you now have two identical contacts in your CRM. This ruins your data quality.
Instead, always use the Upsert operation.
- Add your CRM Node (e.g., HubSpot).
- Set the Resource to
Contact. - Set the Operation to
Upsert. - Choose
Emailas the matching key.
Upsert is a portmanteau of Update and Insert. The CRM will look at the incoming email address and ask: "Do I already know this person?"
- If Yes: It updates the existing contact record with any new information.
- If No: It creates a brand new contact.
This simple toggle keeps your database pristine.
Reality Check: Bad data compounds over time. If you do not handle duplicates early, your sales team will eventually stop trusting the CRM entirely. Taking five extra minutes to configure "Upsert" prevents massive headaches later.
Step 4: Alerting the Team
The CRM is updated. Now, your sales team needs to know about it so they can close the deal.
We do not want to send another email. Inboxes are already too noisy. Instead, push the notification to the platform where your team actually communicates: Slack, Discord, or Microsoft Teams.
Add a Slack node to the end of your workflow. (Check out the Slack API messaging guide for setup details).
Map the extracted data from Step 2 into a clean, scannable message.
Example Slack Message Template:
🚨 **New Lead Alert!** 🚨
**Name:** {{$json.name}}
**Company:** {{$json.company}}
**Email:** {{$json.email}}

🔗 View Contact in CRM
Keep the alert punchy. Include a direct link to the CRM record so the sales rep is only one click away from making the call.
Adding AI Qualification (The Next Level)
Once your basic workflow is running smoothly, you can upgrade it to act as an automated SDR (Sales Development Representative).
Instead of treating every lead equally, use AI to score them before alerting your team.
Insert another AI node right after data extraction. Pass the lead's company name and job title to the AI. Give the AI your ideal customer profile (ICP).
The Prompt: "Based on our ICP (B2B SaaS companies with 50+ employees), score this lead from 1 to 10. Consider their job title and company. Provide a one-sentence reason for the score."
You can then add a Switch node (n8n's version of branching logic):
- If the score is 8 or higher: Send a high-priority Slack alert tagging your senior sales closer.
- If the score is lower than 8: Send a standard alert to the general sales channel.
This ensures your most expensive human talent is only spending time on the highest-value opportunities.
Handling Errors Gracefully
Automations break. APIs go down, passwords expire, and server errors happen. If your lead gen workflow fails silently, you will lose money without realizing it.
n8n has a built-in safety net called the Error Trigger node.
Create a separate, small workflow that starts with the Error Trigger node. Connect it to an email or Slack node that messages you directly.
If any node in your main lead generation workflow fails, this secondary workflow instantly catches the error and sends you a message with the exact details. You can fix the problem before a single lead is lost.
Summary: Stop the Copy-Paste Cycle
Manual lead entry is a bottleneck that chokes small businesses. By building this exact workflow in n8n, you completely eliminate the friction between a prospect showing interest and your sales team making contact.
Here are the critical steps to remember:
- Use Webhooks for instant data capture whenever possible.
- Leverage AI with JSON formatting to perfectly extract data from messy emails.
- Always use the "Upsert" function to protect your CRM from duplicate records.
- Keep team alerts brief and actionable.
Automation is not just about saving time. It is about speed to lead. The faster your team can react to a new inquiry, the higher your conversion rate will be.
Stop moving data manually. Let the machines do the busywork so your team can focus on actually closing deals.
By Kevin Michael Schindler, AI Automation Expert at Evalics
Related Resources
- AI For Lead Generation: 5 Workflows That Actually Convert
- Stop Paying For Zapier: 5 n8n Workflows Every Agency Needs
- Data Quality Matters: Why Your Automation Is Only As Good As Your Data
- What Is AI Lead Qualification? A Simple Guide
Official Sources
- n8n Email Read (IMAP) Documentation
- OpenAI Guide to Structured Outputs
- HubSpot CRM API Documentation
- Sending Messages using Slack Webhooks